
GPT Image 2 can now return a transparent PNG directly. The useful part is not the missing background by itself. It is getting a reusable asset whose edges still look right on a white product page, a dark ad, and a saturated social tile.
Start at the Image3 homepage, open the Image3 Workspace for the broader production flow, then use the GPT Image 2 transparent-background generator. The last link selects Studio and turns on transparent PNG output.

Quick answer: request alpha, then prove it
Use Studio mode, enable Transparent background (PNG), and prompt for one isolated subject with its full silhouette visible. Avoid scenery, floors, frames, printed labels, or a checkerboard preview. Those details give the model something opaque to render behind the subject.
A good first request is short enough to audit:
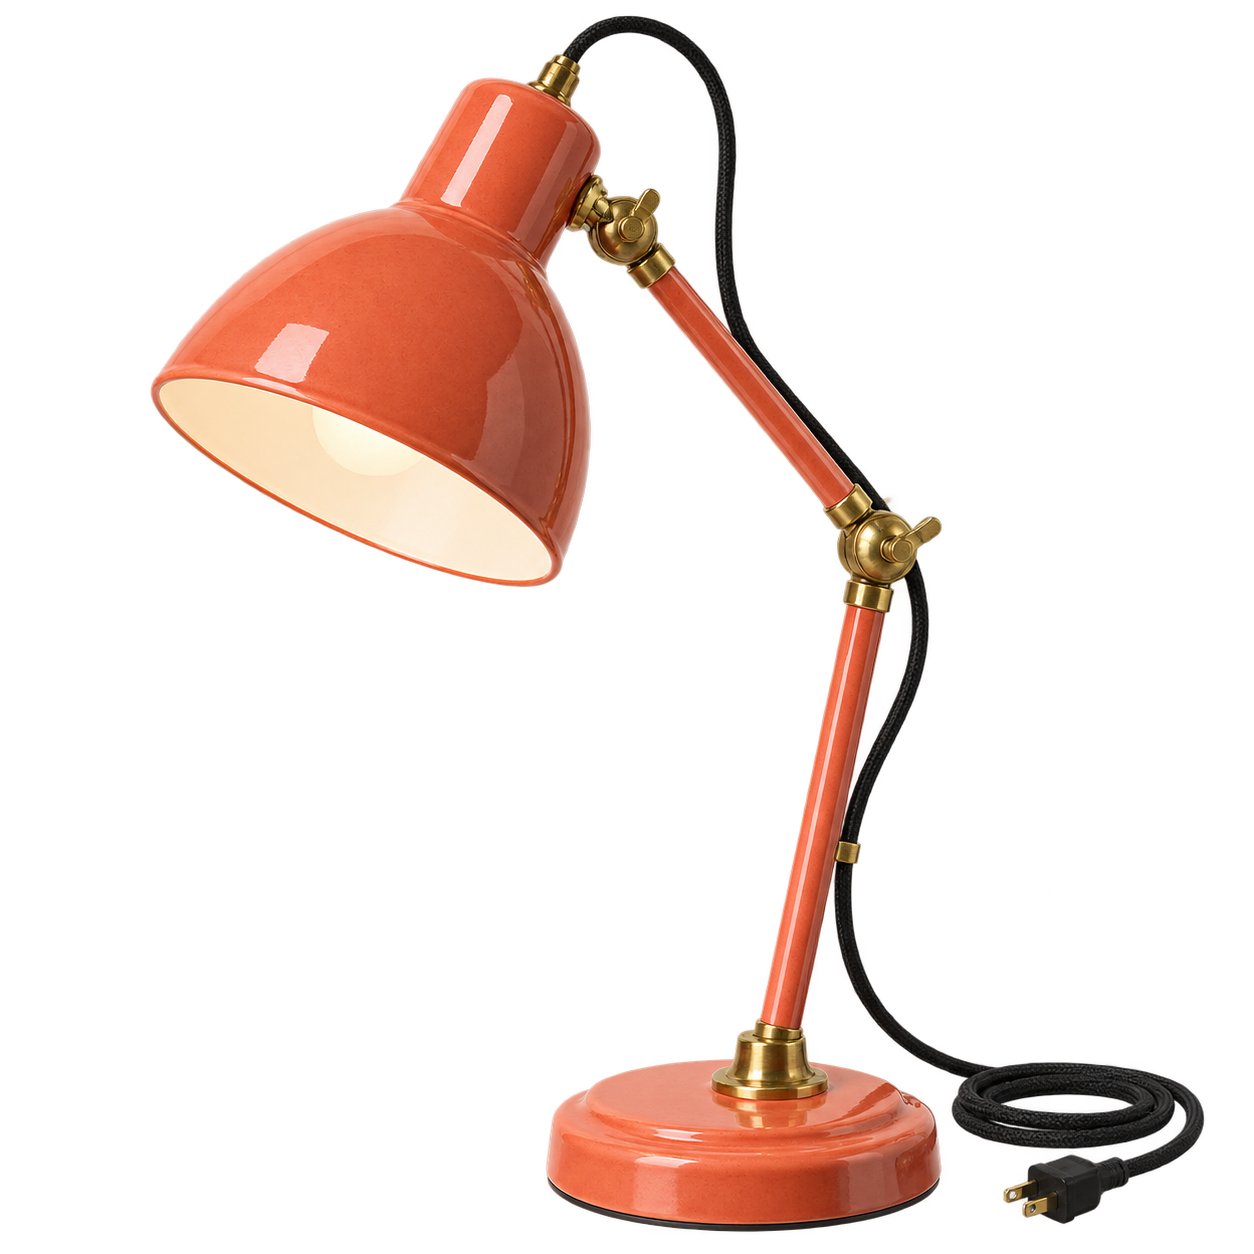
Create one coral ceramic desk lamp as a premium catalog product cutout.
Show the full lamp and power cable with clean separation around every edge.
Use a genuinely transparent background with an alpha channel.
No floor, wall, backdrop, checkerboard pattern, text, logo, watermark, or extra object.
Keep natural highlights on the ceramic and realistic detail in the brass joints.
Download the result as PNG. Then place it over at least three backgrounds. A transparent thumbnail in one browser panel proves very little; many editors display transparency and a baked checkerboard in nearly the same way.
What transparent actually means
A PNG stores color channels plus an alpha channel. Alpha records opacity per pixel: 0 is fully transparent, 255 is fully opaque, and values between them create soft edges, glass, smoke, and feathered shadows. A file can have a .png extension and still be opaque if every alpha value is 255.
The distinction matters around anti-aliased edges. A curved product edge usually contains partially transparent pixels that mix smoothly with a new background. If those pixels were calculated against white, the cutout may carry a pale fringe when placed on black. If they were calculated against black, a dark rim appears on a light page.
The generated lamp below is a genuine RGBA PNG. Download it and test it in your own layout rather than judging only the page preview.
Choose a subject that can be isolated
Native transparency works best when the prompt defines one clear subject. Product packs, icons, stickers, tools, furniture, simple food shots, and character cutouts have readable silhouettes. Crowds, fog, hair in wind, translucent fabric, glass splashes, and scenes filled with particles need a more careful test.
Start with the production requirement, not an aesthetic paragraph. Name the subject, the required crop, and the difficult edges. If the cable, handle, strand of hair, antenna, or transparent material matters, call it out. The model otherwise may simplify or crop exactly the part you need.
SUBJECT: one compact espresso machine with steam wand and power cable.
CROP: full object visible, centered, 12 percent clear space on every side.
EDGE PRIORITY: preserve the steam wand, cable, handle gaps, and small metal controls.
BACKGROUND: genuinely transparent alpha, no surface and no cast environment.
OUTPUT: clean reusable product asset, no text or branding.
If you need several objects, generate them separately when the final layout controls their spacing. One combined image locks their relative positions and shadows together, which limits reuse.
Use the right format and output settings
PNG is the safest working master for transparent assets. It preserves alpha without lossy compression and is widely supported by browsers, editors, marketplaces, and presentation tools. WebP can also retain transparency and usually produces a smaller delivery file. JPEG has no alpha channel, so a transparent request saved as JPEG must become opaque.
Choose resolution from the final use. A small app icon does not need a huge source, but a store hero or print layout needs room for cropping and downsampling. Generate the master larger than the final display size, inspect it at 100 percent, and create smaller delivery copies after approval.
The control contract is simple:
{
  "model": "gpt-image-2",
  "background": "transparent",
  "output_format": "png",
  "quality": "medium"
}
Image3 applies background: transparent and output_format: png together when the transparent switch is active. This prevents the incompatible JPEG combination at the interface level.
Write an isolation-first prompt
The phrase “transparent background” should appear with physical composition instructions. Tell the model there is no floor or wall. Ask for a complete silhouette. Prohibit baked transparency patterns. Describe how difficult materials should behave.
This prompt is useful for a soft object:
Create one folded cream knit scarf as an isolated ecommerce asset.
Preserve loose fibers and the small open gaps between folds.
Use genuine transparent alpha around the complete silhouette.
No mannequin, table, floor, wall, shadow card, border, checkerboard, text, or label.
Keep the knit texture natural without a white outline around the fibers.
And this version handles a translucent object:
Create one clear amber glass perfume bottle, front three-quarter view.
Keep the bottle fully visible with accurate transparent and reflective glass behavior.
Background pixels must be transparent; do not paint white inside the glass.
Preserve the cap, thin glass edges, and internal refraction.
No floor, scenery, logo, label text, checkerboard, or watermark.
Glass is a demanding test because the object is partly defined by what lies behind it. Always composite a glass result over the actual target colors before approval.
Separate the master from the styled shadow
A reusable product master should usually omit a large cast shadow. A shadow generated against an unseen floor can include opaque gray pixels, a white matte, or perspective that does not match the final layout. Add the destination shadow in CSS or your design tool when possible.
Soft contact shadows can still work if they fade through partial alpha and stay close to the object. Test them on dark and colored surfaces. If the shadow turns into a gray rectangle, keep a shadowless master and build the shadow downstream.
.product-cutout {
  filter: drop-shadow(0 18px 22px rgb(15 23 42 / 0.22));
}
CSS drop-shadow() follows the visible silhouette, unlike box-shadow, which follows the rectangular image box. That makes it a practical non-destructive option for web layouts.
Verify alpha instead of trusting the preview
Run a four-part check. First, confirm the file is PNG or WebP and that an alpha channel exists. Second, view it on white and near-black. Third, use a saturated color such as magenta or cyan because colored backgrounds expose pale contamination quickly. Fourth, zoom into the smallest gaps and semi-transparent regions.
On macOS, ImageMagick can report the channel set:
identify -format '%f %[channels]\n' lamp-transparent.png
An RGBA or sRGBA result confirms an alpha channel exists. It does not prove the alpha is useful, so follow with a composite test:
magick -size 1600x1200 canvas:'#111827' \
  lamp-transparent.png -gravity center -composite lamp-on-dark.png
The same asset should survive both sides of this edge test:
Diagnose a fake checkerboard
A transparency grid is only a viewer convention. If the gray-and-white squares remain visible when the file is placed on a red background, the grid is part of the image. The model rendered a picture of transparency rather than transparent pixels.
Regenerate with “genuinely transparent alpha” and “no checkerboard pattern.” Do not ask for a “transparent background preview” because the word preview can encourage a UI-style grid. Ask for the asset itself.
If the subject is otherwise excellent, a background-removal tool can recover a hard-edged product. It is less reliable for glass, hair, smoke, and semi-transparent fabric because a remover has to infer which pixels belong to the subject.
Fix white or dark edge halos
Halos show up when edge pixels contain a matte color. Test the output at 200 to 400 percent over both white and black. Look around hair, cables, fur, glossy rims, spokes, narrow holes, and motion-blurred edges.
Use a focused correction prompt when only one region fails:
Repair only the outer edge of the black braided cable.
Remove the pale fringe and preserve the cable thickness, woven texture, curve, plug, lamp, colors, crop, and all other pixels.
Keep genuine transparent alpha outside the cable. Do not add a shadow or background.
Regenerate when the halo surrounds most of the subject, when internal holes are opaque, or when transparent materials have been filled with white. A global alpha problem usually costs more time to patch than to replace.
Protect internal holes and negative space
Handles, chair legs, bicycle frames, jewelry, plant leaves, and bent cables create enclosed gaps. Those gaps must be transparent too. A clean outer contour can hide an opaque patch inside the silhouette.
Name the gaps in the prompt and inspect them separately. For a chair, check the space below the seat and between every spindle. For a mug, check the handle opening. For the lamp in this guide, the important areas are the open angles around the joints and the loop formed by the cable.
Negative space is part of the asset. Treat each hole like another edge, with the same light, dark, and saturated-background test.
Handle glass, smoke, and soft materials
Partly transparent materials require graded alpha rather than a hard selection. Their appearance changes with the destination background, so one cutout may not work everywhere. A bottle prepared for a pale catalog page can look too dense on a black ad.
Generate and approve against the intended background family. If the asset must work across unrelated themes, keep two masters or simplify the material treatment. Do not “fix” a soft fringe by forcing every pixel to fully opaque or fully transparent; that removes the material quality you wanted.
For a broader way to keep colors, materials, and product identity stable across a set, use the GPT Image 2 brand style reference workflow. When text is also part of the asset, follow the GPT Image 2 infographic prompt workflow and verify the words separately from alpha.
Build variants from one approved master
Approve one neutral master before generating angles, colors, or crops. Keep a short asset contract that records subject identity, crop, transparency, lighting direction, and details that must not change. Then alter one variable at a time.
Use the approved coral lamp as the identity reference.
Change only the viewing angle to a direct front view.
Keep the ceramic color, brass hardware, cable, proportions, light direction,
transparent alpha background, full-object crop, and absence of text unchanged.
This is slower than asking for twelve variants in one request, but the outputs are easier to compare and repair. It also gives the designer a reliable fallback when one variant drifts.
Prepare the production handoff
Keep the original transparent PNG unchanged. Record its pixel dimensions, color profile, creation date, prompt, model mode, and approval notes. Make optimized WebP copies or cropped PNGs from the master rather than repeatedly opening and overwriting it.
For web delivery, test the final URL, MIME type, dimensions, and file size. Confirm the asset remains transparent after any CDN transformation. For app stores and marketplaces, check their file requirements because some channels flatten alpha or add a default background during upload.
The handoff should include at least one dark-background proof and one light-background proof. These are review images, not replacements for the transparent master.
Native alpha or background removal?
Native transparent generation and background removal solve different starting conditions. Native alpha is the better first choice when you are creating a new reusable object. The model can compose the subject with isolation in mind, leave space around fragile parts, and avoid inventing a scene that later has to be cut away.
Background removal starts with an existing opaque image. It is useful when a client has already approved the exact pose, when the source is a photograph that cannot be regenerated, or when a native transparent result keeps changing the subject. The remover estimates a mask from the finished pixels. That gives it less information about semi-transparent boundaries and hidden background colors.
Use this decision rule:
| Starting point | First method | Main risk |
|---|---|---|
| New product or object concept | Native transparent generation | Subject may drift between attempts |
| Approved opaque product shot | Background removal | Edge mask may lose fine detail |
| Glass, smoke, sheer fabric | Native alpha, tested on target colors | Material may need a background-specific master |
| Hair or fur portrait | Try both and compare at 300 percent | Fringing and lost strands |
| Logo-like hard silhouette | Either method | Accidental text or shape changes |
Do not run a clean transparent master through a remover out of habit. A second segmentation pass can harden partial alpha and discard the soft edge that made the native file useful.
Plan an ecommerce asset set
One transparent product image rarely ships alone. A store may need a square catalog tile, a landscape hero, a detail crop, a comparison card, and several color variants. Build those outputs from an approved identity reference rather than regenerating every slot from a fresh text prompt.
Begin with the neutral master: full object, simple light, no floor, no large shadow, and enough clear space for alternate crops. Record the non-negotiable features. For the desk lamp, those might be the coral glaze, three brass joints, black braided cable, round base, and off-white inner shade.
Then create one controlled branch at a time:
IDENTITY SOURCE: approved coral desk lamp reference.
DESTINATION: square ecommerce catalog tile.
CHANGE: rotate the lamp 20 degrees clockwise and raise the shade slightly.
PRESERVE: coral glaze, brass joints, cable, base, proportions, materials, and alpha.
CROP: complete product with 10 percent transparent space on all sides.
FORBID: floor, cast room shadow, scenery, props, text, logo, watermark, checkerboard.
Compare each result with the master before moving to the next branch. A changed hinge count or cable color is an identity error, even if the alpha is perfect. Transparent output does not relax the normal reference-editing checks.
Name files by what they are, not by the order they appeared in a download folder. lamp-coral-front-master.png and lamp-coral-three-quarter-web.webp are easier to audit than generation-14-final-v2.png. Keep the master and delivery copy distinguishable in both filename and storage path.
Use transparent assets safely on the web
Browsers render alpha without extra JavaScript, but layout choices can expose production mistakes. Give the image element dimensions so the page does not jump while it loads. Use object-contain for complete product cutouts, and verify the result against the page's light and dark themes.
<picture>
  <source srcset="/assets/lamp-coral.webp" type="image/webp" />
  <img
    src={transparentAssetUrl}
    width="1254"
    height="1254"
    alt="Coral desk lamp isolated on a transparent background"
    loading="lazy"
  />
</picture>
The fallback PNG preserves transparency for clients that do not select the WebP source. Do not place the asset on a checkerboard in the live product page. A checkerboard is useful in an editor, but it distracts from the product and can make buyers wonder whether the pattern is part of the image.
If a dark theme reveals a fringe that the light theme hides, fix the asset. Avoid covering the problem with a same-colored glow or container background because the next placement will reveal it again.
Keep alpha through resizing and optimization
Optimization tools can flatten transparency when their output format or settings are wrong. Treat every transform as a new asset that needs a channel check. Resizing with ImageMagick retains alpha when the input and output formats support it:
magick lamp-coral-front-master.png \
  -resize '900x900>' \
  -strip \
  lamp-coral-front-900.png
For WebP, use a quality setting that preserves edge detail and verify that the output still reports alpha. Thin cables and hair deserve a visual comparison, not just a smaller byte count.
cwebp -q 88 -alpha_q 100 lamp-coral-front-master.png \
  -o lamp-coral-front-web.webp
Avoid converting the working master to JPEG at any point. Once alpha is flattened against a matte, converting that JPEG back to PNG does not restore the missing transparency.
Accessibility and honest presentation
Alt text should describe the visible subject and why the image is on the page. “Transparent PNG” alone says nothing to a screen-reader user. For an instructional comparison, explain that the same product is being tested on light and dark backgrounds. For a decorative product cutout beside copy that already names the item, a shorter subject description is enough.
Do not imply that an AI-generated product concept is a photograph of an item for sale. Label concept imagery where that distinction affects a purchase or design decision. If the asset depicts a real product, compare labels, ports, buttons, proportions, and included parts with an approved reference before publishing it.
Transparency can also reveal accidental fragments that were hidden against the original preview color: detached highlights, stray shadows, partial letters, and tiny floating shapes. Inspect the complete canvas, not just the main silhouette.
A compact release checklist
Before shipping a GPT Image 2 transparent PNG, confirm each item below:
- The file has an alpha channel, not merely a PNG extension.
- No checkerboard, white rectangle, or studio wall is baked into the pixels.
- The full subject and all required cables, handles, and narrow parts are present.
- Internal holes are transparent.
- Light, dark, and saturated backgrounds reveal no unacceptable halo.
- Glass, hair, smoke, and shadows use believable partial transparency.
- The master is preserved separately from crops and compressed copies.
- Alt text describes the subject and the image's instructional role.
Transparent output is a production setting, not a substitute for review. Generate one clean master, stress-test its edges, and only then build the campaign set.
Return to the Image3 homepage, continue in the Image3 Workspace, or open the GPT Image 2 transparent PNG generator with Studio and alpha output already selected.
How to apply this
- Choose Studio and transparent PNG
Open the GPT Image 2 generator in Studio mode, enable Transparent background, and keep PNG as the output format.
- Write an isolation-first prompt
Describe one complete subject, request clear separation around fine edges, and forbid scenery, floors, text, logos, and baked checkerboards.
- Generate a clean master
Create one high-resolution master before asking for variants, crops, or alternate poses.
- Inspect the alpha channel
Open the PNG over light, dark, and saturated backgrounds and zoom into hair, cables, glass, shadows, and narrow gaps.
- Repair or regenerate
Use a narrow correction prompt when the subject is sound; regenerate when the silhouette, transparency, or material behavior is wrong throughout.
- Export the production asset
Keep the untouched PNG master, then make destination-specific crops and optimized copies from that file.
Frequently asked questions
Does GPT Image 2 support transparent backgrounds?
Yes. Transparent backgrounds are available in preview for GPT Image 2. Use background transparent and export as PNG; JPEG cannot store an alpha channel.
Why does my image show a checkerboard after export?
A checkerboard can be painted into the pixels instead of representing transparency. Inspect the alpha channel or place the PNG over a solid color to tell the difference.
Which format should I use for a transparent GPT Image 2 result?
Use PNG for a lossless working master. WebP can also preserve transparency, but JPEG cannot.
How do I remove white halos around a product cutout?
Regenerate with explicit edge-separation instructions, then test on both light and dark backgrounds. Repair only the affected edge when the rest of the image is correct.
Can transparent images include soft shadows?
They can, but the shadow must fade through partial alpha rather than into a painted floor. Keep a clean shadowless master if the asset will be reused across many layouts.
Should I generate the whole scene and remove the background later?
Generate native transparency first when you need a reusable asset. Use background removal as a fallback for an existing image or when the native output does not separate the subject cleanly.